Hi folks!
Today, we'll take a closer look at the battleship class. Once you got some XP from the initial games, you can quickly branch out from cruisers, and battleships are one of the obvious fun choices - lots of guns, heavy armour, what's not to like.
The Battleship
Battleships have around twice the health of a cruiser, and much better defences (damage reduction, fire / flooding protection etc). Their main batteries consist of large-calibre guns, usually in turrets of two or three. We're talking 300 mm plus shells here. Unlike the early cruisers and destroyers, battleships will use armour piercing shells by default, instead of the other ships' high-explosive ones. They won't cause fires, but due to the high damage output, critical hits (those penetrating into the internal structure of the enemy ship) deal massive amounts of damage.
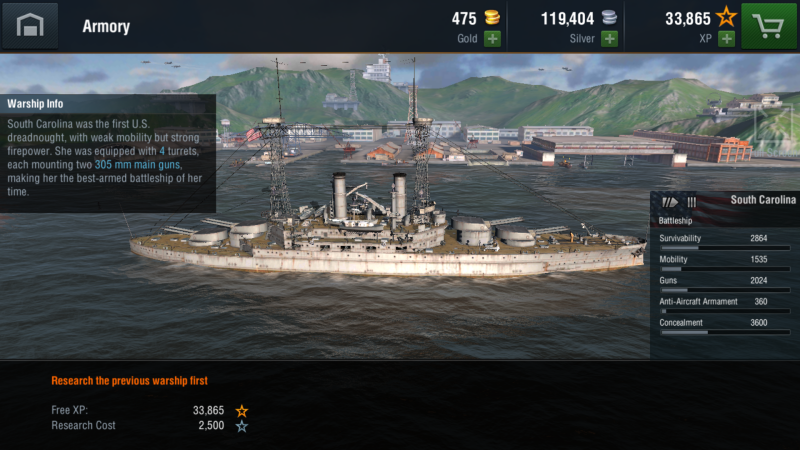
Their secondary guns are usually mounted on both sides, and have a much shorter range, but a higher rate of fire.
On the downside, battleships are usually quite slow - slow in terms of speed, slow in terms of turning, and slow in terms of realigning their turrets. This means they're delivering deadly broadsides, but are in danger of being flanked.
Against other classes
Battleships are pretty deadly against cruisers. Their heavy armour means they can't be easily damaged by the cruiser's smaller-calibre main guns, and cruisers are large enough targets to be fairly easily hit by the devastating main batteries. US and Soviet cruisers have to get very close to hit them with torpedoes, usually not making that an appealing option.
Destroyers, on the other hand, are a huge nuisance. Due to their slow turning speed, and inability to realign their main turrets in time, destroyers will often flank a battleship, meaning they simply drive around them and approach from the "other side". Close-range torpedo salvos will hurt even the mighty battleship, and well-driven destroyers never stand still long enough to be hit reliably by the main batteries.
Success in Slugging it out with other battleships mostly depends on positioning, concentration of firepower and luck. Critical hits from main batteries can do as much damage as a torpedo. The ideal position is an "angled broadside" - just enough for both fore and aft turrets to be able to zero in on target, but exposing as little surface as possible to enemy shells. Ideally, "crossing the T" can be achieved - you catch the enemy battleship out of position, and can land one or two full salvos before they can respond with all their guns.
Battleships have the strongest set of AAA, but they're also the least manoeuvrable, making them prime targets for enemy torpedo bombers. Fortunately, air-dropped torps don't do quite as much damage as the ones launched from destroyers and cruisers, and usually come in smaller numbers. Once a carrier is spotted successfully, battleships can shred them to bits in no time.
Strategies
Battleship captains should pick a side of the map early on. Sailing head-first into an enemy formation is a recipe for disaster - flanking fire will come in quickly, and is hard to react to. Instead, keep the enemy fleet on one side, and keep your turrets trained on that side.
Be sure to target the main batteries as precisely as possible - reloading them takes a really, really long time. You can use the secondaries while waiting for the next salvo to be ready, but they do comparatively little damage. Choose targets wisely - firing a full salvo at a fast-moving destroyer at long range is pretty much a wasted one. A good hit at a damaged cruiser at medium range can possibly sink it, removing its firepower from the battle.
Don't forget to use the secondary guns while the main batteries are reloading - you can usually get two salvos off before the primary ones are ready again. If you've got a clear target, go for a full salvo, but if you're not sure, "zero in" with firing turrets individually first, especially at long range.
Nations
Only two nations currently have battleships in the game - USA and Japan. The Japanese ships tend to be faster, but less heavily armoured, whereas the early US ships are dreadfully slow, but can take a bit more of a beating. They're fairly equivalent, so it's really just a matter of taste which tech tree you chose.
Next time, we'll take a closer look at the destroyers.
Friday, 27 October 2017
Sunday, 22 October 2017
Cruisers
Hi folks!
Next up, we'll take a closer look at the different ship classes, and the respective playstyles. First, the cruiser, since it's the class that's designated "easiest" to play by the game, and it's what you'll be starting out with in tier one.
The Cruiser
Cruisers have average, but balanced capabilities in terms of manoeuvrability, firepower and armour. When progressing through the tiers, cruisers have, on average, around double the hitpoints of destroyers, but only half of battleships. Their armament includes a good number of primary guns, at a lower calibre than battleships' main batteries, but with a faster rate of fire. Secondary guns quickly get replaced by torpedoes, but in smaller numbers than destroyers.
Against other classes
The cruiser usually is quite powerful against destroyers - it's fast enough to chase them, and the numerous main guns get through the weak armour quickly, with fast reload time giving it enough shots to compensate for misses due to the destroyer's agility and small size. You'll have to watch out for torpedoes though, since a single salvo from a destroyer is usually enough to sink a cruiser. While they're more agile than battleships, evading a well-targeted torpedo salvo at close range is almost impossible.
Against battleships, cruisers can again bring their fire rate to bear, but have a very similar problem as against destroyers: A battleship's main battery salvo can shred through a cruiser very quickly, their armour-piercing shells doing some severe critical damage. And, unlike the destroyers, they don't have to come close, but actually outrange your main guns. Cruisers are big enough targets for battleships to hit at 10 km with relative ease.
The next problem a cruiser captain is facing against battleships is their armour plating. Sure, you've got quick-firing triple-gun turrets, but they're 150 mm calibre, and your armour-piercing shots mostly just bounce off the battleship's hull plating, doing no damage whatsoever. Then they respond with a full broadside of their 320 mm main battery, and half your hitpoints are gone in a single salvo.
Lastly, against aircraft carriers. The main issue with destroying aircraft carriers is that you have to get to them. There are some problems with that:
Next up, we'll take a closer look at the different ship classes, and the respective playstyles. First, the cruiser, since it's the class that's designated "easiest" to play by the game, and it's what you'll be starting out with in tier one.
The Cruiser
Cruisers have average, but balanced capabilities in terms of manoeuvrability, firepower and armour. When progressing through the tiers, cruisers have, on average, around double the hitpoints of destroyers, but only half of battleships. Their armament includes a good number of primary guns, at a lower calibre than battleships' main batteries, but with a faster rate of fire. Secondary guns quickly get replaced by torpedoes, but in smaller numbers than destroyers.
Against other classes
The cruiser usually is quite powerful against destroyers - it's fast enough to chase them, and the numerous main guns get through the weak armour quickly, with fast reload time giving it enough shots to compensate for misses due to the destroyer's agility and small size. You'll have to watch out for torpedoes though, since a single salvo from a destroyer is usually enough to sink a cruiser. While they're more agile than battleships, evading a well-targeted torpedo salvo at close range is almost impossible.
Against battleships, cruisers can again bring their fire rate to bear, but have a very similar problem as against destroyers: A battleship's main battery salvo can shred through a cruiser very quickly, their armour-piercing shells doing some severe critical damage. And, unlike the destroyers, they don't have to come close, but actually outrange your main guns. Cruisers are big enough targets for battleships to hit at 10 km with relative ease.
The next problem a cruiser captain is facing against battleships is their armour plating. Sure, you've got quick-firing triple-gun turrets, but they're 150 mm calibre, and your armour-piercing shots mostly just bounce off the battleship's hull plating, doing no damage whatsoever. Then they respond with a full broadside of their 320 mm main battery, and half your hitpoints are gone in a single salvo.
Lastly, against aircraft carriers. The main issue with destroying aircraft carriers is that you have to get to them. There are some problems with that:
- They're at the other end of the map
- You only have 6 minutes to get there
- The whole rest of the enemy fleet is kind of in the way
- They'll start sending aircraft out to drop unpleasant things on you once you get close
Cruisers are actually quite useful in that task, since they're decently fast, and have enough range and firepower on their main guns to sink the weakly armoured carriers quickly.
Strategies
If we're looking at the historic role of cruisers during the early 20th century, they're often designed for escort and merchant interdiction purposes. The big naval battles were fought by heavily armoured battleships, descendants of the ships-of-the-line, in direct broadside engagements.
This is quite close as you should play them in "World of Warships" as well: stick with the heavier battleships, and keep pesky destroyers off their slow-moving backsides. Going out alone with a cruiser is quite risky - run into an enemy battleship line, and you're toast. Run into an enemy destroyer pack, and you're torpedo-toast.
The other option is to go pack-hunting with the destroyers. Cruisers can keep up mostly in terms of speed, and can pack a good punch against enemy destroyers at range. "Warships" is a team game, and mostly those who can work together will win very convincingly.
Nations
There are four nations currently in the game: Soviets, USA, Japan and Great Britain. Three of them have cruisers in the tech tree - the Soviets, in fact, only have cruisers, and the British really just come along for the ride with a single premium ship at the moment anyway.
The Soviet cruisers are focused on main guns. Starting tier four, their range is close to battleships, with a good firing rate. Their torpedoes are a bit of an afterthought, with very short range they're more of a rarely used measure if a careless enemy gets too close.
The US cruisers are more balanced designs, with average torpedo range and main guns, and a decent defence.
The Japanese cruisers play more like oversized destroyers, with very strong, long-range torpedoes, but often inferior main guns. They're fast and good hunters, most suitable to the destroyer-pack approach.
That's it for today, next time, we'll take a closer look at the battleship.
Friday, 20 October 2017
World Of Warships Blitz
Hi folks!
World of Warships has been a very successful real-time strategy game on PC, and now there's a mobile version as well - World of Warships Blitz. I've been playing this for a little while, and very much enjoyed it, so let's take a closer look a the "free to play" setup.

The game currently offers 7v7 tactical naval battles, against real or AI players. Whichever team scores the most points within a 6 minute time-limit wins, points are awarded for controlling areas or sinking enemy ships.
Ships
Ships come in four classes: destroyers, cruisers, battleships and aircraft carriers. Historical ships from the first and second world war are available, from Soviet, British, Japanese and US fleets (although only the Japanese and US fleets are currently properly fleshed out).
The ships are classified in ten tiers, and XP is needed to "research" the next higher tier. XP is gained from battles. Once a ship is researched, it has to be bought using silver. There are multiple ways to increase the ship's capabilities - upgrades to hull, weapons etc using "blueprints" (which are gained in battle), installing equipment (paid for in silver) or using special consumables (again, silver).
Currencies
This brings us to the classic free-to-play multiple currency setup. Silver is the regular currency, which is gained in battle, gold is the "special" currency, which usually has to be paid for with real money. Gold buys a variety of things:
World of Warships has been a very successful real-time strategy game on PC, and now there's a mobile version as well - World of Warships Blitz. I've been playing this for a little while, and very much enjoyed it, so let's take a closer look a the "free to play" setup.
The game currently offers 7v7 tactical naval battles, against real or AI players. Whichever team scores the most points within a 6 minute time-limit wins, points are awarded for controlling areas or sinking enemy ships.
Ships
Ships come in four classes: destroyers, cruisers, battleships and aircraft carriers. Historical ships from the first and second world war are available, from Soviet, British, Japanese and US fleets (although only the Japanese and US fleets are currently properly fleshed out).
The ships are classified in ten tiers, and XP is needed to "research" the next higher tier. XP is gained from battles. Once a ship is researched, it has to be bought using silver. There are multiple ways to increase the ship's capabilities - upgrades to hull, weapons etc using "blueprints" (which are gained in battle), installing equipment (paid for in silver) or using special consumables (again, silver).
Currencies
This brings us to the classic free-to-play multiple currency setup. Silver is the regular currency, which is gained in battle, gold is the "special" currency, which usually has to be paid for with real money. Gold buys a variety of things:
- more ship slots
- create your own fleet (alliance, team, whatever you want to call it)
- profile pictures
- buy premium ships
- buy premium account time
- buy special paint jobs
- convert experience
- buy silver
Some of these are vanity items (like profile pictures), others are quite useful (like premium account time). That said, the way the game is currently set up (and the quite steep price for gold), it's perfectly playable without spending much real money.
Once you've reached tier 6 (out of ten), things slow down very considerably. The cost for new ships scales exponentially, both in terms of XP needed to unlock them, and silver needed to purchase and upgrade them. We'll be taking a closer look in future posts at what's the best path to choose to deal with these, what to expect, as well as the ship types with their strengths and weaknesses and winning strategies.
Conclusion
As always, if you enjoy the game, I'd recommend paying what you feel it's worth to support the developers. But as "free to pay" goes, it's certainly one of the good ones out there.
Saturday, 18 June 2016
Battle strategies
Hi folks!
Today, let's take a closer look at the core of Warlords - the battles, and how to win.
Winning battles gives you many essential items:
Basically, we want to have a strategy for picking our battles in such a way that we can get a couple of victories in a row, before we have to let our troops rest.
Picking the right battle
Battle difficulty is marked with "skulls" on the world map. One-skull battles should be pretty easy to win without major casualties. Two-skull battles are somewhat harder, but well doable with the right strategy.
For three-skulls, you'll struggle to win at all, with major to almost complete casualties. Four-skull battles are really just there to tease you.
Crushing victory
There's a second aspect to picking your battles, besides difficulty - you'll get a limited amount of turns to win a "crushing" victory. This will give a substantial gold bonus (up to doubling your gold gain). And gold is always in short supply - higher-level upgrades are expensive, and while we could use diamonds to buy gold, the exchange rate is terrible, and, of course, diamonds are rare.
A good approach is to pick some easy one-skull battles in quick succession, and then going all-in for a two-skull one. This will leave your units depleted, but you can then put the game away, and pick up again with fresh units after a couple of hours.
Always try to get the "crushing" victory - you'll need the gold, and it makes the challenge more interesting as well.
The crucial first turn
The biggest advantage that you have on your side is the "first turn" - you get to deal damage first. And since most units deal damage according to their size, you can severely depleting the enemy forces in your first attack. One exception is the Guardian class, who can deal disproportionate damage with their "Retribution" perk.
Usually, you'll encounter two kinds of maps: Those where you want to attack in the first turn, and those where you want to evade.
It all comes down to range. Consider the Archer unit: she moves three tiles, has a range of three tiles, and can use the "Rain of Fire" perk to extend damage range to four tiles, so their range is six tiles, all in all. Next up are Cavalry (up to five tiles movement, one tile range) and Mages (three tiles move, two tiles range).
If you can deal some serious damage in the first turn, or have no way of a tactical retreat to get out of range, attacking forward is the only option. Otherwise, step back just out of enemy range, and do a full-impact attack next turn.
Examples
In the first map, all our units are in range of the enemy archers. This is a two-skull battle, the enemy heroes are mostly three-star, higher level ones, so we can't steamroll them.
But since there's nowhere for us to retreat, there's only one way, forward. Make use of the terrain (forest tiles reduce damage by 50%), and use the tactical capabilities of your units.
Most importantly, the Archers can use the "Rain of Fire" perk to deal damage and almost immobilise enemy units for three turns. In combination with the Guardian's blocking ability, we can focus down the front units, while delaying the ones further back.
Now, in the second map, we have a choke point with good defence in the centre, tempting to occupy directly, and then let them run into it.
Don't be fooled. The enemy has two ranged units, and especially the Mages are strong against our frontline units. They also have Pikes, who can remove our units from the forest defences and expose them before attacking. Lastly, the forest is lined by a ridge, which gives enemies attacking downhill a 50% attack bonus.
A better strategy is to just move our archers one tile back, and let the enemy move first. This should at least bring their Mages into our range the next turn, allowing our Archers to take them out. We can then push into the forest ourselves, and pick up the enemies at the choke point.
We still won't get through without some damage, but we've got three ranged units, two Archers and the Mages, which are going to deal devastating damage, forest or not. The Guardians have high health, probably our Cavalry will take a decent beating, though.
Reserves
Which brings us to the last point for today - reserves. In the second scenario, I'd probably not be using the Cavalry in the next battle, since they're understrength. But I have a strong Pike unit in reserve, as well as a somewhat weaker second Cavalry unit.
So even after a damaging battle, I can still fight another full one (5v5 or 5v7) by using my reserves. Usually, I play three to five battles in a round, exhausting my units in the last one, then put the game aside and come back to it later, when they've recovered.
Today, let's take a closer look at the core of Warlords - the battles, and how to win.
Winning battles gives you many essential items:
- units that fought gain XP (no matter if you won, or lost),
- gold
- weapons, armour and banners for heroes
- upgrade items
- regimental shards for hero level-ups
Basically, we want to have a strategy for picking our battles in such a way that we can get a couple of victories in a row, before we have to let our troops rest.
Picking the right battle
Battle difficulty is marked with "skulls" on the world map. One-skull battles should be pretty easy to win without major casualties. Two-skull battles are somewhat harder, but well doable with the right strategy.
For three-skulls, you'll struggle to win at all, with major to almost complete casualties. Four-skull battles are really just there to tease you.
Crushing victory
There's a second aspect to picking your battles, besides difficulty - you'll get a limited amount of turns to win a "crushing" victory. This will give a substantial gold bonus (up to doubling your gold gain). And gold is always in short supply - higher-level upgrades are expensive, and while we could use diamonds to buy gold, the exchange rate is terrible, and, of course, diamonds are rare.
A good approach is to pick some easy one-skull battles in quick succession, and then going all-in for a two-skull one. This will leave your units depleted, but you can then put the game away, and pick up again with fresh units after a couple of hours.
Always try to get the "crushing" victory - you'll need the gold, and it makes the challenge more interesting as well.
The crucial first turn
The biggest advantage that you have on your side is the "first turn" - you get to deal damage first. And since most units deal damage according to their size, you can severely depleting the enemy forces in your first attack. One exception is the Guardian class, who can deal disproportionate damage with their "Retribution" perk.
Usually, you'll encounter two kinds of maps: Those where you want to attack in the first turn, and those where you want to evade.
It all comes down to range. Consider the Archer unit: she moves three tiles, has a range of three tiles, and can use the "Rain of Fire" perk to extend damage range to four tiles, so their range is six tiles, all in all. Next up are Cavalry (up to five tiles movement, one tile range) and Mages (three tiles move, two tiles range).
If you can deal some serious damage in the first turn, or have no way of a tactical retreat to get out of range, attacking forward is the only option. Otherwise, step back just out of enemy range, and do a full-impact attack next turn.
Examples
In the first map, all our units are in range of the enemy archers. This is a two-skull battle, the enemy heroes are mostly three-star, higher level ones, so we can't steamroll them.
But since there's nowhere for us to retreat, there's only one way, forward. Make use of the terrain (forest tiles reduce damage by 50%), and use the tactical capabilities of your units.
Most importantly, the Archers can use the "Rain of Fire" perk to deal damage and almost immobilise enemy units for three turns. In combination with the Guardian's blocking ability, we can focus down the front units, while delaying the ones further back.
Now, in the second map, we have a choke point with good defence in the centre, tempting to occupy directly, and then let them run into it.
Don't be fooled. The enemy has two ranged units, and especially the Mages are strong against our frontline units. They also have Pikes, who can remove our units from the forest defences and expose them before attacking. Lastly, the forest is lined by a ridge, which gives enemies attacking downhill a 50% attack bonus.
A better strategy is to just move our archers one tile back, and let the enemy move first. This should at least bring their Mages into our range the next turn, allowing our Archers to take them out. We can then push into the forest ourselves, and pick up the enemies at the choke point.
We still won't get through without some damage, but we've got three ranged units, two Archers and the Mages, which are going to deal devastating damage, forest or not. The Guardians have high health, probably our Cavalry will take a decent beating, though.
Reserves
Which brings us to the last point for today - reserves. In the second scenario, I'd probably not be using the Cavalry in the next battle, since they're understrength. But I have a strong Pike unit in reserve, as well as a somewhat weaker second Cavalry unit.
So even after a damaging battle, I can still fight another full one (5v5 or 5v7) by using my reserves. Usually, I play three to five battles in a round, exhausting my units in the last one, then put the game aside and come back to it later, when they've recovered.
Tuesday, 7 June 2016
Warlords upgrade system
Hi folks!
After we've got an overview of the different unit types last time, let's take a closer look at the upgrade system today.
Battalion upgrades
In order to upgrade the battalions, we need the respective upgrade items, and cash. The items come from crates, the marketplace and, mostly, winning battles.
Levelling up the battalion via XP gained from battles opens up new upgrade paths.
There are three stats that can be upgraded:
After we've got an overview of the different unit types last time, let's take a closer look at the upgrade system today.
Battalion upgrades
In order to upgrade the battalions, we need the respective upgrade items, and cash. The items come from crates, the marketplace and, mostly, winning battles.
Levelling up the battalion via XP gained from battles opens up new upgrade paths.
There are three stats that can be upgraded:
- HP - amount of damage each unit can take before they are disabled
- Damage - amount of damage each unit dishes out
- number of soldiers in the battalion
Each upgrade level has four items, and once all four are purchased, you get a bonus, which is often considerable.
Upgrades cost cash, which is non-purchasable with real-world money, but has to be won in battles.
Upgrades take a while to complete - the higher the level, the longer the wait. Given that there are five classes, there's heaps of upgrading to do, and waits can be skipped using the secondary "diamonds" currency.
Avoiding spending real money on those (you won't really get many, unless you put some serious cash into them) is a matter of scheduling. Quickly check occasionally if an upgrade has finished, and start another one, even if you don't plan to battle. Only takes a second, and you'll be constantly upgrading, improving your units.
Upgrade priority
Upgrades are pretty balanced - you'll need all three (health, damage and soldier count). Personally, I put a slight priority on soldier count, but they're almost equally important.
A bigger factor is the bonus set. They're equal across units in terms of soldier count, but e.g. Guardians get better bonus HP, Archers get high damage output etc. - so keep the roles in mind, and go with your favourite units.
Hero upgrades
A secondary upgrade system is the hero level, counted in "stars". You collect "shards", via the premium crate, special battles or rare loot. Levelling up the hero increases offence/defence capabilities massively, and allows for better gear.
Gear levels follow the usual pattern (gray - common, green - uncommon, blue - rare, purple - epic, orange - legendary). Someone has clearly been playing "Need For Speed" :).
There are three types of gear:
- Weapons - these can have critical damage or magical damage, which can easily double a hit
- Armour - increases physical and magical resistance. I usually go with physical primarily, since mages are fairly easy to snipe, and they're the only unit dealing magical damage.
- Banner - increases offence, which is weighed against the enemy's defence stat, to determine how much damage is caused, with other factors. Can also give critical hit chance.
So higher level, higher gear. Gears themselves can be upgraded for gold - higher level gear can be upgraded higher as well.
Getting shards
You get shards from the premium chest, which shows up every two days for free. You can buy them for diamonds, which is a decent investment, since you'll get some other stuff (upgrades, gear) as well, but it's a game of chance.
You get shards from the battles in the "Brigand Island" - three shards for every level you win. I recommend saving these up for when you unlock the secondary units, and you're in the situation of having to quickly level up, say, another archer unit. Since you can chose which unit gets the shards, they come in rather handy.
You can get shards from the loot wagon in special "Brigand" battles - make sure to have the unit you want shards for the most collect the wagon. That can be a tactical challenge by itself occasionally, since you have to collect it before you kill the last enemy unit.
Very rarely, you get shards in regular battles. Lastly, you can buy them for diamonds in the marketplace - that's probably the best investment for your diamonds, since you can control what you want to buy. Look out for more than one on offer, since they're discounted.
That's it for today. Next time, we'll have a look at battle strategies.
Saturday, 4 June 2016
Warlords - units
Hi folks!
Let's take a bit of a closer look at the unit classes in Warlords, after the general free-to-play overview the other day. I quite enjoy turn-based games, so I'm having some fun with this one.
Guardians
Slow, close combat class. High health and armour ratings. They get a damage bonus against Pikes and Archers. Move three fields, one field range. Their passive perk prevents any adjacent enemy unit from moving more than one field past them. The active perk is a "last stand" attack, that deals damage according to damage taken so far by the Guardians.
These folks are frontline fighters. Get them in range quickly, to create choke points, allowing your ranged units to rain down hell on the enemy. Weak against Cavalry and Mages. Good to position in a forest (-50% damage taken), or town (30% damage healed per round).
In a desperate battle, try to get them into a town, especially if both enemy positional perks (Cavalry push and Pikes seize position) are exhausted. The town will continuously heal the Guardians, and you can deal huge damage once when they're low on health. This way, you can hold out against, and wear down a much larger enemy force, and eventually win, even with just this one unit.
When fighting Guardians, always make sure to kill them entirely in one turn, or you'll get the "last stand" damage next round, which is hugely annoying. Best way to deal with them is to pry them into the open via Cavalry or Pikes, and then hit them with everything else.
Archers
My favourite unit. They have the longest range in the game - three fields movement, three fields ranged attack, plus one field on the area-of-effect "rain of fire" perk. This means they can usually attack across almost the whole battlefield in the first, crucial turn. Their health and armour is decent, direct damage is huge, and they get the class bonus against the pesky Mages.
Generally, try to position them in a defended (forest) or high-ground (+50% damage output) position, such that they can't be reached by enemy close range units. Guardians are their natural pair, since they prevent breakthroughs with their passive perk.
The Archers' active perk allows to create a three-by-three area of fire for three turns, which deals 25% of base damage each turn, and slows all enemy units to one field per turn. Against lower-class enemies, this can wipe out their entire army in one turn, and with high enough archer damage, it even hits stronger ones pretty badly.
More importantly, you can effectively block off certain areas of the battlefield, again creating chokepoints, or allowing enemies to be dealt with piecemeal.
My usual tactics is to position them in a safe (unreachable or defended) location in the first attacking turn, and take out the enemy Archers, or Mages, if they're unusually strong. Guardians, Pikes and Cavalry hold the line, and in the subsequent turns, the Archers obliterate one enemy after the other.
Be careful if they get caught at close range, as they'll no longer be able to use ranged attacks, unless you can move them away.
Archers are definitely worth having a good second unit of, although it took me bloody ages to get there (and then I got two subsequently).
Pikes
Pikes are decent front-line fighters, with the same range/movement as Guardians. They get a class bonus against Cavalry, and a defence & damage bonus when operating in closed ranks (adjacent to friendly units).
Their most powerful weapon is their active perk, "seize position". This one-off attack allows them to swap positions with an enemy unit before attacking. This is hugely annoying, when employed against you - have a cavalry unit on a forested hilltop, giving them +50% on damage and defence? Pikes go to into the swamp next to it (+50% damage taken), swap out with your cavalry, and you're hit with double damage + class bonus - and they sit in your nice, defensible spot for the next turn. Urgh.
Of course, you can use it the same way yourself, prying enemy units out of their frontline positions, shoving them into range of your own line (or into a swamp) and having them obliterated.
Cavalry
Cavalry units are the fastest movers - they have a natural move range of four fields, and their passive perk allows them to move an additional field at the cost of 50% damage reduction that turn. Cavalry gets a class bonus against Guardians. Their active perk is somewhat similar to the Pikes', but less useful - where Pikes can swap positions pre-attack, Cavalry can push an enemy unit out of their position post-attack, but only if the field to push into is unoccupied.
Cavalry is very useful at pushing through enemy lines early on, and getting a first strike against soft targets. The downside is that they'll be pretty much unsupported the next turn, and have the rest of the enemy line crush them, so be careful with those rushes.
I usually use them to either get a good shot at Archers or Mages, if they're in reach, or to defend in front of my own Archers, allowing them to get as close as possible to the enemy lines, and take a shot at their ranged units.
Mages
Lastly, we have spellcasters. They naturally are the weakest in close quarters combat, and their range of only two fields means they've got to get dangerously close to enemy positions to take a shot. This often means holding them back in the first attack, if you can't position them in a way that they won't be wiped out the next.
Their natural friends are the Guardians, since their battlefield control allows them closer to enemy positions. But their main weapon is their active perk: An area-of-effect spell with a range of two fields around their current position. It charges up at 25% damage per turn, so usually not something you want to use in the first attack anyway - but once it's ready, powerful Mages can wipe out most parts of the enemy army in one go, or at least do some serious damage.
Which is why I usually target enemy Mages early on.
That's it for the unit overview. Next time, we'll have a look at the upgrade system, and some more strategies of how to have fun without spending much real-world money.
Let's take a bit of a closer look at the unit classes in Warlords, after the general free-to-play overview the other day. I quite enjoy turn-based games, so I'm having some fun with this one.
Guardians
Slow, close combat class. High health and armour ratings. They get a damage bonus against Pikes and Archers. Move three fields, one field range. Their passive perk prevents any adjacent enemy unit from moving more than one field past them. The active perk is a "last stand" attack, that deals damage according to damage taken so far by the Guardians.
These folks are frontline fighters. Get them in range quickly, to create choke points, allowing your ranged units to rain down hell on the enemy. Weak against Cavalry and Mages. Good to position in a forest (-50% damage taken), or town (30% damage healed per round).
In a desperate battle, try to get them into a town, especially if both enemy positional perks (Cavalry push and Pikes seize position) are exhausted. The town will continuously heal the Guardians, and you can deal huge damage once when they're low on health. This way, you can hold out against, and wear down a much larger enemy force, and eventually win, even with just this one unit.
When fighting Guardians, always make sure to kill them entirely in one turn, or you'll get the "last stand" damage next round, which is hugely annoying. Best way to deal with them is to pry them into the open via Cavalry or Pikes, and then hit them with everything else.
Archers
My favourite unit. They have the longest range in the game - three fields movement, three fields ranged attack, plus one field on the area-of-effect "rain of fire" perk. This means they can usually attack across almost the whole battlefield in the first, crucial turn. Their health and armour is decent, direct damage is huge, and they get the class bonus against the pesky Mages.Generally, try to position them in a defended (forest) or high-ground (+50% damage output) position, such that they can't be reached by enemy close range units. Guardians are their natural pair, since they prevent breakthroughs with their passive perk.
The Archers' active perk allows to create a three-by-three area of fire for three turns, which deals 25% of base damage each turn, and slows all enemy units to one field per turn. Against lower-class enemies, this can wipe out their entire army in one turn, and with high enough archer damage, it even hits stronger ones pretty badly.
More importantly, you can effectively block off certain areas of the battlefield, again creating chokepoints, or allowing enemies to be dealt with piecemeal.
My usual tactics is to position them in a safe (unreachable or defended) location in the first attacking turn, and take out the enemy Archers, or Mages, if they're unusually strong. Guardians, Pikes and Cavalry hold the line, and in the subsequent turns, the Archers obliterate one enemy after the other.
Be careful if they get caught at close range, as they'll no longer be able to use ranged attacks, unless you can move them away.
Archers are definitely worth having a good second unit of, although it took me bloody ages to get there (and then I got two subsequently).
Pikes
Pikes are decent front-line fighters, with the same range/movement as Guardians. They get a class bonus against Cavalry, and a defence & damage bonus when operating in closed ranks (adjacent to friendly units).Their most powerful weapon is their active perk, "seize position". This one-off attack allows them to swap positions with an enemy unit before attacking. This is hugely annoying, when employed against you - have a cavalry unit on a forested hilltop, giving them +50% on damage and defence? Pikes go to into the swamp next to it (+50% damage taken), swap out with your cavalry, and you're hit with double damage + class bonus - and they sit in your nice, defensible spot for the next turn. Urgh.
Of course, you can use it the same way yourself, prying enemy units out of their frontline positions, shoving them into range of your own line (or into a swamp) and having them obliterated.
Cavalry
Cavalry units are the fastest movers - they have a natural move range of four fields, and their passive perk allows them to move an additional field at the cost of 50% damage reduction that turn. Cavalry gets a class bonus against Guardians. Their active perk is somewhat similar to the Pikes', but less useful - where Pikes can swap positions pre-attack, Cavalry can push an enemy unit out of their position post-attack, but only if the field to push into is unoccupied.Cavalry is very useful at pushing through enemy lines early on, and getting a first strike against soft targets. The downside is that they'll be pretty much unsupported the next turn, and have the rest of the enemy line crush them, so be careful with those rushes.
I usually use them to either get a good shot at Archers or Mages, if they're in reach, or to defend in front of my own Archers, allowing them to get as close as possible to the enemy lines, and take a shot at their ranged units.
Mages
Lastly, we have spellcasters. They naturally are the weakest in close quarters combat, and their range of only two fields means they've got to get dangerously close to enemy positions to take a shot. This often means holding them back in the first attack, if you can't position them in a way that they won't be wiped out the next.Their natural friends are the Guardians, since their battlefield control allows them closer to enemy positions. But their main weapon is their active perk: An area-of-effect spell with a range of two fields around their current position. It charges up at 25% damage per turn, so usually not something you want to use in the first attack anyway - but once it's ready, powerful Mages can wipe out most parts of the enemy army in one go, or at least do some serious damage.
Which is why I usually target enemy Mages early on.
That's it for the unit overview. Next time, we'll have a look at the upgrade system, and some more strategies of how to have fun without spending much real-world money.
Friday, 27 May 2016
Warlords - nice little hex tactical
Hi folks!
I started with a new game a while ago: "Warlords", a nice little hex-field, turn-based, tactical fantasy game in the ever-fashionable "Orcs vs Humans" genre.
Forget about the minimal storyline. You're in control of a group of regiments, of five different classes (warriors, pikes, cavalry, archers and mages), each led by a different hero. Each class has different strengths and weaknesses, of the paper-rock-scissors - variety.
Heroes gain XP, level up, and can be equipped with personal and battalion-level upgrades. Battles usually involve between three and five of your own regiments, and three to seven enemy ones.
Battles are short, and the game is quite snappy, with relatively low battery impact. All in all, it's a fun, non-brain-dead way to spend some minutes.
Financial aspects
Warlords has the common system of dual currencies - gold and diamonds (which are rare, and can be bought for real world money). There are no ads, which is a nice touch for a free-to-play game.
The game also doesn't rub "SPEND $$$ NOW OR FACE MASSIVE PAIN" in your face. Cash is earned by winning battles, and used to buy upgrades.
The main "nagging" system is wait-based. When a battalion is damaged in battle, it takes some time for it to recover to full strength. This is actually a neat strategic aspect, and not annoying at all. Of course, you could spend diamonds to skip that wait.
The second wait aspect is upgrade time - the higher the upgrade level, the longer the wait. Again, you could use diamonds to skip that, but it's really not necessary.
Lastly, you can use diamonds to buy "regiment shards", either via the merchant or the premium crate system, to level-up for better weapons and armour.
Obtaining premium currency
The ingame store is rather pricey - you can't do much with the $8 minimum purchase. A better way is to get diamonds through the
game, and not waste them on impatience.
There's a chance for getting diamonds in the Raider missions, and you get some for ranking in the monthly leaderboard as well.
Of course, you get regimental shards (the only thing you'd really want to spend diamonds on) occasionally for winning battles, so it's really more of a booster effect to get ahead in the game quickly.
Conclusion
All in all, I really quite like the game. It's well-designed, the developers are responsive, it's easy on the battery and loading times, non-naggy in terms of real-world $$$ and ad-free. I can recommend anyone who's into fantasy / turn-based-tactical to give it a go.
I started with a new game a while ago: "Warlords", a nice little hex-field, turn-based, tactical fantasy game in the ever-fashionable "Orcs vs Humans" genre.
Forget about the minimal storyline. You're in control of a group of regiments, of five different classes (warriors, pikes, cavalry, archers and mages), each led by a different hero. Each class has different strengths and weaknesses, of the paper-rock-scissors - variety.
Heroes gain XP, level up, and can be equipped with personal and battalion-level upgrades. Battles usually involve between three and five of your own regiments, and three to seven enemy ones.
Battles are short, and the game is quite snappy, with relatively low battery impact. All in all, it's a fun, non-brain-dead way to spend some minutes.
Financial aspects
Warlords has the common system of dual currencies - gold and diamonds (which are rare, and can be bought for real world money). There are no ads, which is a nice touch for a free-to-play game.
The game also doesn't rub "SPEND $$$ NOW OR FACE MASSIVE PAIN" in your face. Cash is earned by winning battles, and used to buy upgrades.
The main "nagging" system is wait-based. When a battalion is damaged in battle, it takes some time for it to recover to full strength. This is actually a neat strategic aspect, and not annoying at all. Of course, you could spend diamonds to skip that wait.
The second wait aspect is upgrade time - the higher the upgrade level, the longer the wait. Again, you could use diamonds to skip that, but it's really not necessary.
Lastly, you can use diamonds to buy "regiment shards", either via the merchant or the premium crate system, to level-up for better weapons and armour.
Obtaining premium currency
The ingame store is rather pricey - you can't do much with the $8 minimum purchase. A better way is to get diamonds through the
game, and not waste them on impatience.
There's a chance for getting diamonds in the Raider missions, and you get some for ranking in the monthly leaderboard as well.
Of course, you get regimental shards (the only thing you'd really want to spend diamonds on) occasionally for winning battles, so it's really more of a booster effect to get ahead in the game quickly.
Conclusion
All in all, I really quite like the game. It's well-designed, the developers are responsive, it's easy on the battery and loading times, non-naggy in terms of real-world $$$ and ad-free. I can recommend anyone who's into fantasy / turn-based-tactical to give it a go.
Subscribe to:
Posts (Atom)